Calculating the number of bars in footing is a crucial step in any building project. It ensures that the footing can bear the load of the structure without collapsing. If you are a builder or a homeowner planning to build your house, it’s essential to know how to calculate the number of bars in footing.
In this article, we will discuss the steps involved in calculating the number of bars in footing. We will also answer some frequently asked questions that can help you understand the process better.
Understanding Footing and Reinforcement
Before diving into the calculation process, it’s crucial to understand what footing and reinforcement mean.
Footing is a part of the foundation that is in direct contact with the soil. It’s usually made of concrete and acts as a support for the structure. Reinforcement is a technique that involves adding steel bars to the footing to increase its strength and stability.
Factors Affecting the Number of Bars in Footing
The number of bars in the footing depends on various factors. Some of the essential factors are:
The size and depth of the footing
The load-bearing capacity of the soil
The type and size of the structure being built
The climate and weather conditions in the region
Calculation Process for the Number of Bars in Footing:
Step 1: Determine the size and depth of the footing.
Step 2: Determine the load-bearing capacity of the soil by conducting a soil test.
Step 3: Calculate the total load that the footing needs to bear. This can be done by adding the weight of the structure, its contents, and any additional loads.
Step 4: Determine the type and size of the reinforcing bars required for the footing. This depends on the total load that the footing needs to bear, the size and depth of the footing, and the type of steel being used.
Step 5: Calculate the spacing between the bars. This depends on the size and depth of the footing and the type of steel being used.
Step 6: Calculate the total number of bars required for the footing by dividing the length of the footing by the spacing between the bars.
The construction sector has been revolutionised by 3D printing in recent years. As a result of 3D printing, the construction industry has entered a new era of almost unlimited design possibilities. Architects, designers, and builders use 3D printing for everything from large multi-story buildings to bridges.
The construction industry’s use of 3D printing
Construction industries such as housing, bridges, and more have benefited greatly from the use of 3D printing technology. There are a number of advantages of 3D printing for construction, including the potential for cost savings and faster production.
Besides creating intricate parts, 3D printing is also used to develop internal piping and ventilation systems. Using this technology, builders can construct internal buildings more quickly and efficiently than they did in the past.
The use of 3D printing also allows for the creation of complex scaffolding that would have been difficult and time consuming to create with traditional methods. In the subsequent steps of the construction process, this scaffolding will be used to support the other steps. A strong support structure is particularly useful in high-rise buildings and complex constructions.
When it comes to construction, 3D printing technology is evidently a game-changer. By using this method, you can save money, speed up production, and improve accuracy over traditional construction methods. Additionally, scaffolding and models can be created before construction begins. Construction is sure to undergo a revolution as 3D printing becomes more widely used.
Design and Architecture
The rise of 3D printing is transforming architecture and design in unprecedented ways. A building’s infrastructure and appearance have been mapped out by architects and structural engineers for centuries by hand. Buildings and other structures can now be constructed faster, more efficiently, and more cost-effectively thanks to 3D printing technology.
Compared to traditional building processes, 3D printing offers a number of advantages. The first advantage of 3D printing is its speed, which eliminates the need for long-term design and construction processes. Furthermore, 3D printing allows for more detailed designs, which allows for greater creativity and innovation when designing buildings and other structures.
The cost of 3D printing structures is also much lower than traditional construction methods. As a final benefit of 3D printing, construction waste is reduced, reducing the environmental impact of building construction.
Architecture and design can benefit greatly from 3D printing technology. In traditional construction methods, it would have been impossible to create curved walls, complex designs, and other innovative features. Construction and design are likely to become staples of the industry as 3D printing continues to develop.
Engineers, architects, and designers can use 3D printing technology to create more cost-effective, efficient, and aesthetically pleasing structures, revolutionizing the way things are built and designed in the future.
Merits of 3D Printing in Construction
There are many merits of using 3D printing in the field of construction, some of these merits are as follows:
1. Environmentally friendly: Compared to conventional building techniques, 3D printing is significantly more ecologically friendly. Up to 99% less material may be used, which leads to considerably fewer emissions of dangerous air and water contaminants. Also, as components are produced utilising 3D printing rather than dangerous chemicals, less energy and water are utilised in manufacturing.
2. Time-saving: A substantially shorter building period is possible thanks to 3D printing’s superior speed and efficiency compared to conventional construction techniques. The time-consuming setup procedures and costly tooling required for conventional manufacturing techniques may be avoided by using 3D printing to make components fast and precisely. Additionally, sophisticated components that were previously difficult or impossible to fabricate may now be created via 3D printing.
3. Economical: By removing the requirement for personnel and other resources connected with conventional construction methods, 3D printing significantly reduces the cost of construction. Components that are 3D printed may be manufactured rapidly, accurately, and with little waste. Moreover, because 3D printing may be done on-site, shipping expenses can be significantly decreased or even eliminated.
Construction work involves many techniques, each with its unique purpose. Two such techniques are plastering and pointing. While these methods may seem similar at first glance, they serve distinct purposes and are used in different situations. In this article, we will explore the Differences between Plastering and Pointing in Construction to help you understand their applications and make informed decisions for your construction projects.
What is Plastering in Construction?
Plastering is a technique used to create a smooth and even finish on walls and ceilings. It involves the application of a plaster mixture made of cement, sand, and water, to a surface using a trowel. The plaster mixture is then smoothed out and left to dry, creating a smooth and level surface suitable for painting or wallpapering.
What is Pointing in Construction?
Pointing is a technique used to strengthen and protect brickwork. It involves filling in the gaps between bricks using a mortar mixture, creating a sealed and stable structure. Pointing also adds an aesthetic element to brickwork by providing a neat and even finish.
Differences between Plastering and Pointing in Construction
a. Purpose
The main difference between plastering and pointing is their purpose. Plastering is used to create a smooth and even surface on walls and ceilings, while pointing is used to strengthen and protect brickwork.
b. Application
Plastering is applied to walls and ceilings, while pointing is applied to brickwork.
c. Material
Plastering requires a plaster mixture made of cement, sand, and water, while pointing requires a mortar mixture made of cement, sand, and lime.
d. Tools
Plastering requires a trowel, while pointing requires a pointing trowel.
When to Use Plastering in Construction?
Plastering is used when a smooth and even surface is required on walls and ceilings. This is often the case when preparing a surface for painting or wallpapering. Plastering is also used in the construction of false ceilings and decorative features.
When to Use Pointing in Construction?
Pointing is used when brickwork needs to be strengthened and protected. This is often the case with older buildings where the mortar may have deteriorated over time, or when constructing new brickwork that needs to be sealed and stabilized.
FAQs about Plastering and Pointing in Construction:
Chains are flexible because of these rings. Measuring units are required in every aspect of life. Similarly, calculations and measurements are valuable in construction, surveying, or other fields. Any entity can be measured using various instruments, just as with units. Chains are an instrument used in the measurement.
Measurement chains have 100 galvanized mild steel wire links of 4mm diameter. Work is carried out precisely and accurately using measurements. Measurements are used in every corner of the house, from the kitchen to the office. In addition to meters, centimeters, feet, inches, acres, yards, and more, there are various measurements.
Define Chain Surveying
A chain or tape is used to measure each side of the triangle in chain surveying. Each triangle is divided into small triangles in certain areas. To measure the area of land, different types of chains are used in surveying.
Besides measuring length and width only, chain surveying does not take angular measurements, making it an ideal method for small, less obstructed areas. The term chain triangulation is also used to describe chain surveying.
Chain Types
Revenue Chain
There are 16 links in this Revenue chain, each with a height of 2.06 feet, which is commonly used in cadastral surveys. It is a standard size of 33 feet, and each link is 2 feet long.
Surveyor Chain
It consists of 100 links that measure .66 feet each so that the chain is 66 feet long. Surveyors’ chains are also known as Gunter’s chains.
Steel Band Chain
Steel Band chain consists of a broad strip of blue steel with uniform dimensions of 12mm to 16mm and .3mm to .6mm thickness. When continuous use is experienced, the links bend and the length of the chain shortens due to the constant bending of the chain.
Metric Chain
There are many types of chains used in surveying, but the metric chain is widely used among them. It is widely used in surveying and is available in standard lengths such as 5 meters, 10 meters, 20 meters, and 30 meters.
While in surveying, metric chains generally have a length of 20m, and some interval tallies are fixed to simplify measuring. In the case of chain lengths from 5 meters to 10 meters, tallies are fixed every 1 meter, and in the case of chain lengths from 20 meters to 30 meters, the tallies are fixed every 5 meters.
Slabs are an essential part of any construction project. Whether it’s for a commercial building, a residential property, or a public infrastructure project, slabs play a crucial role in the overall structural integrity of the building. Therefore, it’s essential to prepare slabs with the utmost care and attention to detail. In this article, we’ll discuss some important points to consider when preparing slabs that will help you achieve better results than your competitors.
Choose the Right Material
The first and most important point to consider when preparing slabs is to choose the right material. The material used in preparing slabs should be durable, strong, and able to withstand the weight and pressure of the building it will be supporting. The most commonly used materials for slab preparation are concrete and steel. Concrete is a popular choice because it’s relatively inexpensive and easy to work with, while steel is known for its strength and durability. Both materials have their advantages and disadvantages, so it’s important to weigh them carefully before making a decision.
Ensure Proper Reinforcement
Reinforcement is an important aspect of slab preparation that is often overlooked. Without proper reinforcement, the slab will be more susceptible to cracking and breaking under the weight of the building it supports. Reinforcement can be achieved through the use of steel bars, wire mesh, or fiber reinforcement. The choice of reinforcement will depend on the specific needs of the project, so it’s important to consult with a professional engineer to determine the best option.
Proper Curing
Curing is the process of allowing the slab to dry and harden properly. Proper curing is essential to ensure that the slab reaches its full strength potential. The curing process can take several days or even weeks, depending on the type of material used and the conditions in which it’s being cured. The temperature and humidity of the environment can have a significant impact on the curing process, so it’s important to ensure that the curing conditions are optimal.
Use the Right Equipment
Using the right equipment is essential when preparing slabs. The equipment used should be appropriate for the size and scope of the project. It’s important to use equipment that is well-maintained and in good working condition. This will not only help to ensure the quality of the slab but will also increase the safety of the workers on the site.
Proper Mixing
Mixing the material properly is crucial to the strength and durability of the slab. The ratio of materials used and the method of mixing will depend on the type of material used. It’s important to follow the manufacturer’s instructions carefully when mixing the materials to ensure that the slab has the proper consistency and strength.
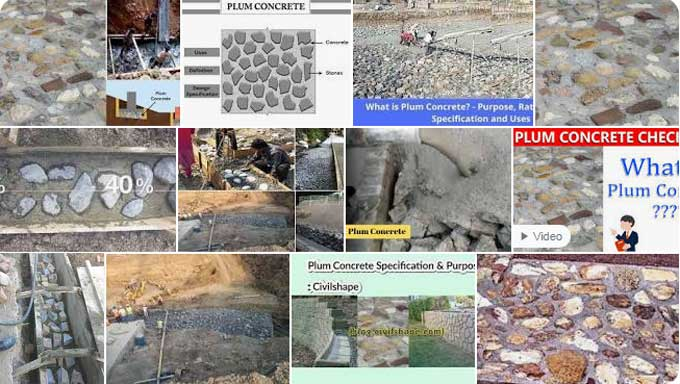
Often called cyclopean concrete, plum concrete is a mixture of wet concrete and large, strong, clean boulders or aggregates of roughly 300 millimetres. The plum makes up about 30–40% of the overall weight of the poured-in-place material.
Plum concrete is created by adding medium to large stones as fillers that range in size from 300mm and higher. Enhancing the apparent yield of concrete for a given amount of cement, it prevents the use of too much cement without sacrificing strength.
The inclusion of plum in concrete reduces the amount of hydration heat necessary since it prevents the need for too much cement while preserving the material’s strength. Common uses for plum concrete include the construction of gravity dams, embankments, the filling of deep or uneven terrain, foundations, etc. It is a less expensive alternative to normal cement.
What is the difference between Plum Concrete and Plain Cement Concrete (PCC)?
One of the simplest forms of concrete is plain cement concrete, which is composed of cement and water. In order to produce it, essential ingredients such as cement, fine aggregates, and coarse aggregates are mixed together in a mixer.
Plum concrete, on the other hand, is the type of concrete in which large stones are used as filler material instead of aggregates in order to create the desired shape.
Hence, plain cement concrete and plum concrete differ only in that large boulders are added to the concrete mix. In addition to serving as a filler material, it reduces the need for small-sized aggregates, which are usually expensive. In this way, concrete costs can be reduced.
What are the properties of Plum Concrete?
1. The diameter of natural stone or boulders, or plums, typically ranges from roughly 150 mm to 300 mm. After giving the project, the accessibility of pertinent resources, and the findings of pertinent engineering judgements full consideration, the size is decided. 2. Concrete made from plums is best made with sharp-edged stones. 3. Grease, grime, and anything else that could prevent the plum from adhering to concrete should be removed from the plum. 4. It must be of a high standard, durable, and free from segregation, seams, cracks, and any other structural flaws or imperfections. 5. Plum surfaces should not become rounded off from use and ageing.
Manufacturing of Plum Concrete
There are two simple ways to manufacture plum concrete, also known as rubble concrete or cyclopean concrete. In either case, the plums can be added to the concrete mix during mixing or spread over the normal concrete layer and then covered with another layer. When placing the plums in concrete, special attention must be paid to preventing air traps. Following is a general description of the manufacturing process:
1. The quality of the Plum material:
1. The plum must not be flaky and it must not have any kind of clay or dirt. 2. If there is any kind of dust found on the surface of the plum materials then it must be immediately cleaned before usage. 3. For plum materials, it is important that they are tough, durable, and preferably of the same rock as that from which aggregates are made.
2. The batching of plum material:
1. In order to manufacture plum concrete, the stones required for the manufacturing process are carefully selected by hand. A batching process is then carried out on the plum material. You should be able to find plum material up to 300mm in diameter. 2. There should be a maximum of 1/3 of the total volume of concrete devoted to plum material. Workers can either pick the plum material by hand or just pick it randomly from the site.
3. The placing of the Plum Concrete:
1. The amount of concrete needed will decrease by up to 50% and the amount of plum will increase by up to 50% if the plum materials are positioned closely together. 2. A layer of concrete is then poured over the plum material. Another layer of plum material is put over the concrete once the gaps between the plum materials have been gradually filled with concrete. 3. Until the required level is attained, this process is repeated. Air traps must be avoided with great care when putting on plum concrete as they could reduce the strength of the material. One must also make sure that they are distributed randomly.
At CivilGuidelines, we understand that the process of reinforced cement concrete (RCC) slab casting can be a challenging and complex process. That is why we have put together this brief guide to help you better understand the process and make informed decisions when selecting a contractor for your next project.
1. Preparing the Site
The first step in the RCC slab casting process is site preparation. The site must be levelled and compacted before the work can begin. This is to ensure that the foundation is strong enough to support the weight of the slab. In some cases, excavation may be necessary to remove any obstructions or to reach the desired depth for the foundation.
2. Building the Formwork
Once the site is prepared, the next step is to build the formwork. This is the frame that will hold the concrete in place while it sets. The formwork must be strong and secure, and it must be built to the precise dimensions of the slab. The formwork is typically made from wood, steel or aluminium.
3. Reinforcing the Slab
Before the concrete is poured, reinforcement bars are laid within the formwork. These bars are essential to the strength and durability of the slab. The bars are placed in a grid pattern and tied together to form a sturdy framework.
4. Pouring the Concrete
Once the formwork and reinforcement are in place, the concrete can be poured. The concrete mix must be carefully selected to ensure that it meets the required strength and durability standards. The mix is poured into the formwork, and it must be spread evenly to avoid any air pockets or weak spots.
5. Finishing the Surface
After the concrete has been poured, it must be smoothed and levelled. This is done using a trowel, and it is essential to achieve a smooth, level surface. The surface can also be polished or textured, depending on the desired finish.
6. Curing the Concrete
The final step in the RCC slab casting process is to cure the concrete. This is done by keeping the slab moist and cool for a period of several days. Curing is essential to ensure that the concrete reaches its full strength and durability potential.
At CivilGuidelines, we have a team of experienced professionals who understand the complexities of the RCC slab casting process. We are committed to delivering high-quality workmanship and using the best materials available to ensure that our clients receive the best possible results.
What do you mean by structural design in construction?
Structural design is a waypoint of civil engineering that is sometimes also considered to be the skeletal structure of construction as a whole. Identifying the most cost-effective specification for a structure or structural component is the foundation of structural design.
A structural engineer often supervises the on-site construction of projects on behalf of other planning professionals, such as architects and building services engineers. Structural integrity plays a crucial role in the functionality and safety of industrial equipment, hospital instruments, and automobiles.
Design Principles for Robust Structures
Creating a structure that can sustain all applied loads for the period of its planned life is the basic objective of structural analysis and design. Poorly designed system components may malfunction, leading to serious repercussions including significant expenses or, in the worst case, the loss of life, which cannot be compared to any cost.
In order to create stable, practical, and cost-effective structures, the structural engineer must first determine the structure’s purpose and configuration.
1. Direction – It is the direction of the force that determines its course. Strong winds, such as those in hurricanes, would act against the house’s side, while heavy rainfall, heavy snowfall, or hailstorms would act downwards in the direction of gravity. A variety of materials and reinforcement systems are needed in order to effectively combat different types of forces.
2. Magnitude – A measure of the magnitude of all the forces acting on a structure at any given time. It is crucial for engineers to determine and analyze all the forces that are applied to a structure during its construction and operation. After a thorough calculation of all the load-bearing capacities of all the structural components, the design of the structural components should be determined.
3. Location – It is also the position of the force that determines its action. An engineer should take into account the effects of expected forces on each individual region of the structure, not just on the whole structure as a whole.
It is crucial for the sturdiness of a structure that civil and structural engineers consider all three properties of forces when studying or analyzing the structure.
What is the procedure of Structural Design?
1. The Functional design – It is essential that building components are constructed in accordance with the codes and standards from the beginning of the design process. The following may be involved:
a. Positioning of the Beam b. Layouts of staircase c. Orientation and placement of the Column d. Selecting proper footing e. Layouts of slab
2. Structural Analysis Model: After the initial design is completed, the dimensions of each building element must be calculated. A structural analysis model is constructed based on the building’s initial measurements. The model must include all loads acting on the structure, such as dead loads, live loads, wind loads, and earthquake loads.
3. Designing algorithms: You can easily build according to the applicable code now that you know how the elements strain based on their initial sizing. It has become so much easier to design with spreadsheets or any other program that helps.
Using the new dimensions obtained from the previous design, the research model should be updated, and the analysis should be repeated. It is determined what forces are internal, and the design is updated accordingly. During subsequent iterations, the element design must be the same as in the previous iteration.
4. Designing the foundation: Considering the soil’s bearing capacity and the structure’s loading, the foundation system form can be selected after determining the final dimensions of the members.
Deciding on the depth of the foundation – Temperature, moisture content variation, and erosion do not affect the depth below ground level and it may be as low as 450 millimetres deep in granular soils, or it may reach 1 m deep depending on the site. The inverted level underside of the foundation is determined by the depth of the basement, boiler house, service ducts, or similar structures.
Calculating the foundation area – Based on the typical (working) loads and the estimated allowable pressure, the required foundation area is calculated. The preliminary design can be determined by determining the type or combination of types of foundations. In general, structural design, cost, and speed are taken into account when making the decision.
Bridges are an essential part of infrastructure, connecting people, cities, and countries. The materials used to build bridges have evolved over time, and advancements in technology and materials science have led to the development of many different types of bridge materials. In this guide, we will explore the top 4 key bridge materials, their properties, advantages, and disadvantages.
Concrete Bridges
Concrete is one of the most commonly used bridge materials, especially for short to medium span bridges. The primary advantage of concrete bridges is their durability, as they can last for up to a hundred years. Concrete is also a low-maintenance material, making it ideal for bridges that are difficult to access for regular maintenance. Additionally, concrete bridges can withstand harsh weather conditions, such as heavy rainfall and earthquakes.
The main disadvantage of concrete bridges is their high cost, which makes them unsuitable for low-budget projects. Concrete bridges also require a long construction time, which can be a significant drawback for projects with strict timelines.
Steel Bridges
Steel is a popular bridge material because of its strength, durability, and versatility. Steel bridges are suitable for medium to long span bridges and can be easily prefabricated off-site, making construction quicker and less expensive. Steel bridges can also be designed to withstand high levels of traffic and heavy loads.
One disadvantage of steel bridges is that they are susceptible to corrosion, especially in areas with high levels of salt or moisture. Regular maintenance is essential to prevent corrosion, which can significantly reduce the lifespan of steel bridges. Another disadvantage is the noise generated by traffic passing over the bridge, which can be a nuisance for nearby residents.
Timber Bridges
Timber bridges have been in use for centuries and are still used for short to medium span bridges. The primary advantage of timber bridges is their low cost, as timber is a readily available material. Timber bridges are also aesthetically pleasing, blending in with natural surroundings and providing a warm and rustic appearance.
The main disadvantage of timber bridges is their durability, as they are susceptible to rotting, warping, and termite damage. Regular maintenance is essential to ensure the longevity of timber bridges, which can be a significant drawback for bridges that are difficult to access.
Composite Bridges
Composite materials, such as fiberglass and carbon fiber, are gaining popularity in bridge construction. Composite bridges offer many advantages, such as high strength, durability, and resistance to corrosion. They are also lightweight, making them easier to transport and install, and can be designed to be aesthetically pleasing.
One of the main disadvantages of composite bridges is their high cost, which can be a significant drawback for low-budget projects. Composite materials are also relatively new in the field of bridge construction, and their long-term durability and reliability are not yet fully established.
Keeping your roof ventilated is essential to maintaining its integrity. You can reduce energy costs and prolong the life of your roof by installing roof vents in addition to improving air circulation.
Varieties of Roof Vents
1. Turbine Vents
Roof turbines commonly referred to as whirlybirds or turbine vents are crucial for maintaining a building’s adequate ventilation. Turbine vents are air exhausts that are positioned on a building’s roof to promote air exchange. Turbine vents are helpful in both business and residential settings because they provide natural air ventilation, which lowers energy expenditures.
An aerodynamic turbine vent is composed of a cylindrical housing with an attached wind turbine. Wind turbines are designed to spin in the wind, creating updraft vents. Through the vent, the exhaust air is pulled out of the building by the spinning turbine, which causes an increase in air pressure inside the housing. Without fans or other systems, this is an efficient way to exhaust air from a building.
2. Wind Turbines
The use of wind turbines is one of the most popular methods of generating renewable energy. A generator generates electricity by spinning a generator using the wind’s power. Ridgelines and open plains with good wind resources are places where wind turbines are installed.
Wind turbine blades capture kinetic energy and convert it into mechanical energy. Electricity is produced by turning a generator with this mechanical energy. Various uses can be made of the electricity produced by wind turbines by connecting them to a power grid.
Compared to other renewable energy sources, wind turbines have several advantages. It differs from other forms of renewable energy, such as solar energy, in that they do not require fuel to generate electricity.
3. Gable Vents
Gable vents have a number of uses, but they are usually used to keep the attic and home cool in the summer. Gable vents assist in controlling the temperature in the attic, which might otherwise grow too hot and harm the materials thereby allowing hot air to exit and cooler air to enter. In the winter, they can aid in preventing snow from accumulating on the roof and melting into the attic.
Additional ventilation offered by gable vents helps prevent moisture buildup that might harm the structure of the house. They also lessen the possibility of mould and humidity growing in the attic.
What is the process of roof ventilation?
Ventilation is essential to ensuring your roof is properly ventilated. There will usually be intake vents installed in the overhangs of the roof at the bottom. It is common for exhaust vents to be located near the roof’s peak.
Air is continuously circulated throughout the attic thanks to these two vents. By bringing in cool outside air and exhausting warm, humid air, the hot air will rise and escape through the intake vents, while the cooler air gets drawn into the intake vents.
It is ideal to have an equal amount of both types of vents to allow the air to freely circulate in the space. You should have a few more intake vents than exhaust vents if you cannot install equal amounts of vents. A small amount of pressure is created here, which allows the air to flow nicely. According to most building codes, every 150 square feet of attic floor space must have one square foot of ventilation.
In an attic with a large volume and a steep pitch, ventilation may be necessary. Maintaining a properly ventilated attic and roof is one of the best ways to maintain a comfortable home.
Installing Roof Vents: Step-by-Step Instructions
Whenever a roofing project involves ventilation, roof vents can be an essential component. By reducing heat buildup in the attic, extending the life of your roof, and reducing energy costs, roof vents provide effective and efficient ventilation. The steps for properly installing roof vents are listed below.